> ## Documentation Index
> Fetch the complete documentation index at: https://docs.elizaos.ai/llms.txt
> Use this file to discover all available pages before exploring further.
# Publish a Plugin
> Publish your elizaOS plugin to the elizaOS registry
**Video Tutorial**: [**Create + Publish Your Own Plugin**](https://www.youtube.com/watch?v=3wVxXMwSzX4\&list=PLrjBjP4nU8ehOgKAa0-XddHzE0KK0nNvS\&index=6)
This guide assumes you have a working plugin. If you need to create one first, see [Create a Plugin](/guides/create-a-plugin)
Once you've built and tested your plugin locally, you'll want to publish it so others can discover and use it. You'll need an npm account and GitHub account for authentication.
***
## Step 1: Prepare for Publishing
### Navigate to your plugin
Start from your working plugin directory. If you followed the [Create a Plugin](/guides/create-a-plugin) guide:
```bash Terminal theme={null}
cd plugin-fal-ai
```
### Verify plugin requirements
Your plugin needs these key elements for registry acceptance:
**Required files:**
```
plugin-fal-ai/
├── src/
│ └── index.ts # Your plugin code
├── images/ # Registry assets
│ ├── logo.jpg # 400x400px, max 500KB
│ └── banner.jpg # 1280x640px, max 1MB
├── package.json # Plugin metadata
├── README.md # Documentation
└── dist/ # Built files (from `bun run build`)
```
**What the publish command validates:**
* `name` starts with `plugin-` (auto-added by CLI if missing)
* Custom `description` (not the default generated placeholder)
* Required images in `images/` directory
Create an `images/` directory if it doesn't exist:
```bash Terminal theme={null}
mkdir -p images
```
Add these two custom images for your plugin's branding on the registry:
* **`logo.jpg`** - 400x400px square logo (max 500KB)
* **`banner.jpg`** - 1280x640px banner (max 1MB)
Use high-quality images that represent your plugin's functionality clearly. The logo will appear in plugin listings at various sizes.
Replace the default generated description with something descriptive:
```json package.json theme={null}
{
"name": "plugin-fal-ai",
"version": "1.0.0",
"description": "ElizaOS plugin for fal-ai", // [!code --]
"description": "Generate videos from text using fal.ai MiniMax Hailuo-02 model", // [!code ++]
"keywords": ["plugin", "elizaos"]
}
```
Ensure your plugin is built and ready:
```bash Terminal theme={null}
bun run build
```
This creates the `dist/` folder that npm will publish.
***
## Step 2: Check authentication
Make sure you're logged into both npm and GitHub:
### Check npm login
```bash Terminal theme={null}
npm whoami
```
If you see your username, you're already logged in. If you see an error, continue to the next step.
```bash Terminal theme={null}
npm login
```
Follow the prompts to enter your:
* Username
* Password
* Email address
* One-time password (if 2FA is enabled)
### Check GitHub authentication
```bash Terminal theme={null}
gh auth status
```
If you see your GitHub username, you're logged in. If you see an error or "not logged in":
```bash Terminal theme={null}
gh auth login
```
If `gh` command is not found, you'll need to install GitHub CLI from [cli.github.com](https://cli.github.com) or the publish command will prompt you to create a token manually.
***
## Step 3: Test Publishing (Dry Run)
Before actually publishing, test the entire process to catch any issues.
### Run publish test
```bash Terminal theme={null}
elizaos publish --test
```
This command will:
* Check your npm and GitHub authentication
* Validate your plugin structure
* Check for required images and descriptions
* Show you exactly what would happen without making any changes
**Example output:**
```
✓ Found existing NPM login: your-username
✓ GitHub token validated
⚠ Plugin validation warnings:
- Missing required logo.jpg in images/ directory (400x400px, max 500KB)
- Missing required banner.jpg in images/ directory (1280x640px, max 1MB)
- Description appears to be default generated description
Your plugin may get rejected if you submit without addressing these issues.
Do you wish to continue anyway? No
```
Address any validation errors before proceeding. Your plugin may be rejected by maintainers if it's missing required assets or has placeholder content.
### Run dry run (optional)
For an even more detailed preview:
```bash Terminal theme={null}
elizaos publish --dry-run
```
This generates all the registry files locally in `packages/registry/` so you can see exactly what will be submitted.
***
## Step 4: Publish Your Plugin
Once your test passes and you're satisfied with the setup, run the actual publish command.
### Execute full publish
```bash Terminal theme={null}
elizaos publish
```
You will be asked for a scoped Github token and given these instructions:
1. Go to [GitHub Settings → Developer settings → Personal access tokens](https://github.com/settings/tokens)
2. Click **"Generate new token (classic)"**
3. Name it **"elizaOS Publishing"**
4. Select these scopes:
* `repo` (Full control of private repositories)
* `read:org` (Read organization membership)
* `workflow` (Update GitHub Action workflows)
5. Click **"Generate token"**
6. **Copy the token and paste it when prompted by the CLI**
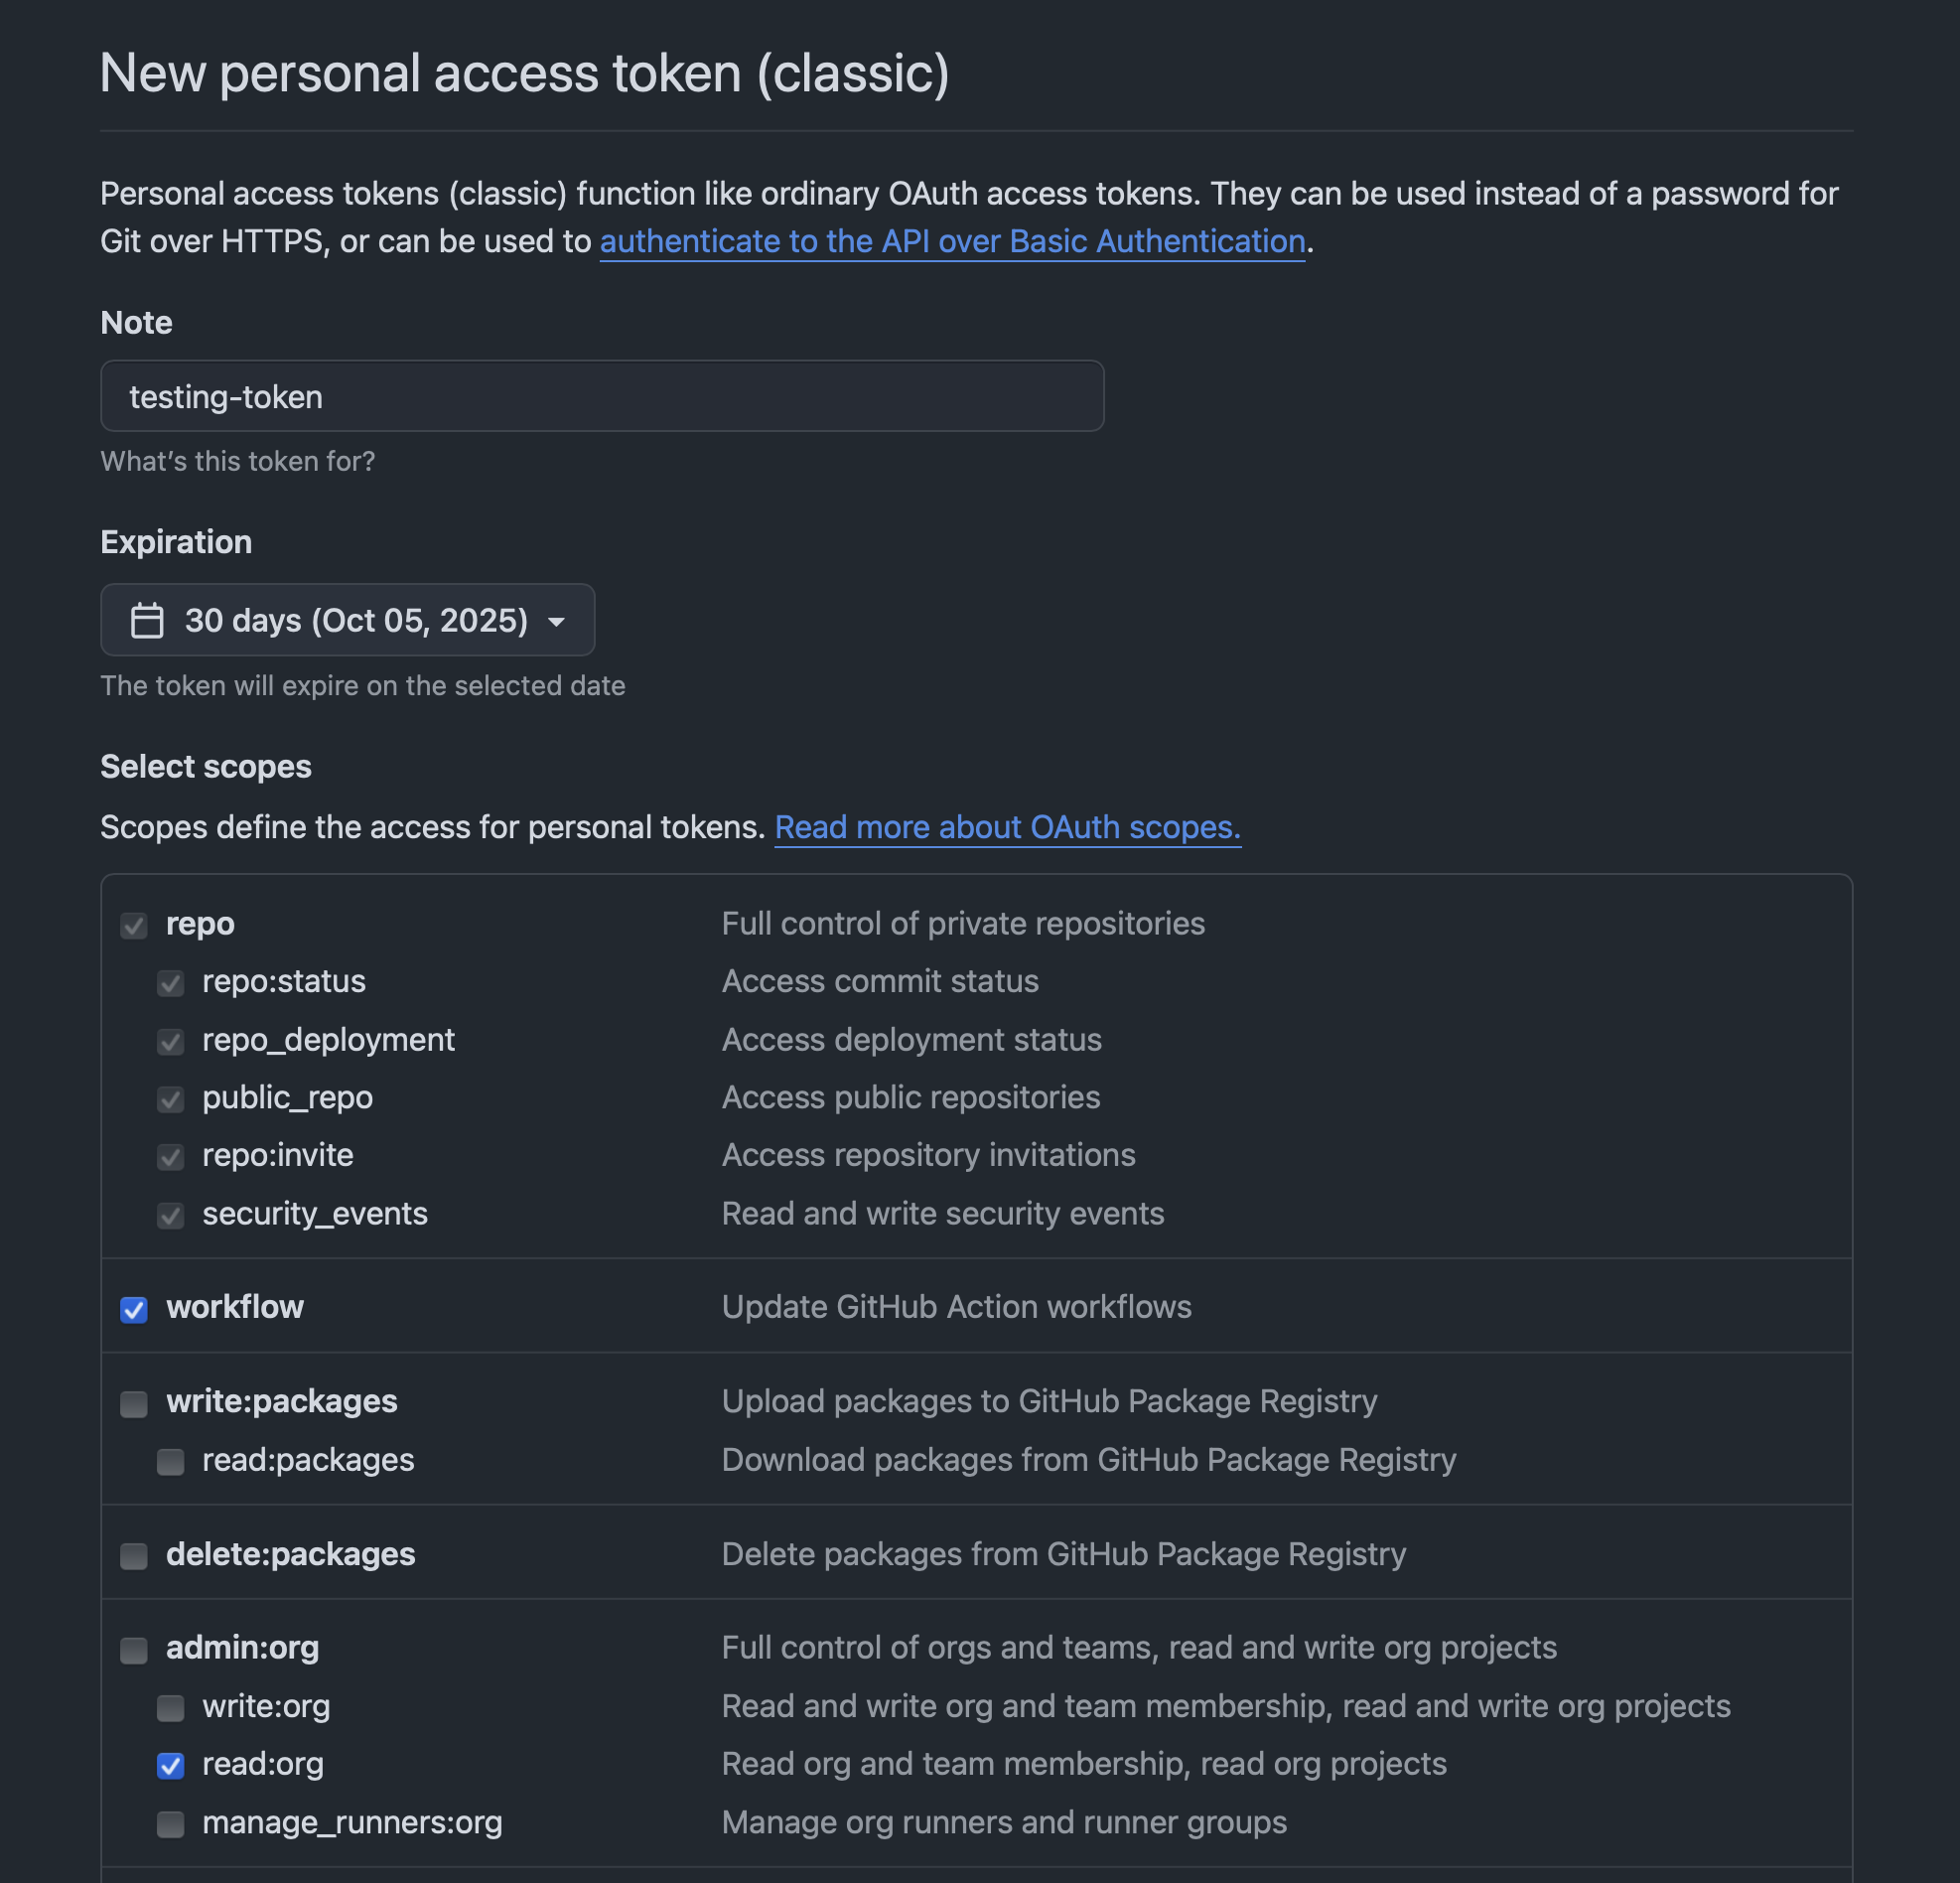 Make sure to test that your plugin is configured correctly before publishing, as it will cause unnecessary delay if something is wrong.
**Example successful output:**
```
✓ Successfully published plugin-fal-ai@1.0.0 to npm
✓ Created GitHub repository: yourusername/plugin-fal-ai
✓ Registry pull request created: https://github.com/elizaos-plugins/registry/pull/123
Your plugin is now available at:
NPM: https://www.npmjs.com/package/plugin-fal-ai
GitHub: https://github.com/yourusername/plugin-fal-ai
```
***
## Step 5: Registry Review Process
### What happens next
1. **npm Package** - Available immediately at `https://npmjs.com/package/your-plugin-name`
2. **GitHub Repo** - Created immediately at `https://github.com/yourusername/plugin-name`
3. **Registry Pull Request** - Opened at [elizaos-plugins/registry](https://github.com/elizaos-plugins/registry/pulls)
### Registry approval
An elizaOS core team member will review your registry pull request to ensure all requirements are met, the plugin is free of malicious code, and it functions as intended with proper images and a quality description.
**Typical review time:** 1-3 business days
**If approved:** Your plugin appears in the official registry and can be discovered via `elizaos plugins list`
**If changes requested:** Address the feedback and update your plugin, then re-submit.
***
## Step 6: Post-Publishing
### Plugin is now live!
Once approved, users can install your plugin to their projects:
```bash Terminal theme={null}
elizaos plugins add plugin-fal-ai
```
### Future updates
**For plugin updates after initial publishing:**
The `elizaos publish` command is only for initial publication. For all future updates, use standard npm and Git workflows - never run `elizaos publish` again.
```bash Terminal theme={null}
# 1. Make your changes and test locally
# 2. Update version in package.json
npm version patch # or minor/major
# 3. Build and test
bun run build
elizaos test
# 4. Publish to npm
npm publish
# 5. Push to GitHub
git add .
git commit -m "Update to version x.y.z"
git push origin main
```
The elizaOS registry automatically syncs with npm updates, so you don't need to manually update the registry.
***
## See Also
Help improve elizaOS by contributing to the core framework
Explore existing plugins and find inspiration
Master all elizaOS CLI commands for development
Share your plugin and get help from the community
Make sure to test that your plugin is configured correctly before publishing, as it will cause unnecessary delay if something is wrong.
**Example successful output:**
```
✓ Successfully published plugin-fal-ai@1.0.0 to npm
✓ Created GitHub repository: yourusername/plugin-fal-ai
✓ Registry pull request created: https://github.com/elizaos-plugins/registry/pull/123
Your plugin is now available at:
NPM: https://www.npmjs.com/package/plugin-fal-ai
GitHub: https://github.com/yourusername/plugin-fal-ai
```
***
## Step 5: Registry Review Process
### What happens next
1. **npm Package** - Available immediately at `https://npmjs.com/package/your-plugin-name`
2. **GitHub Repo** - Created immediately at `https://github.com/yourusername/plugin-name`
3. **Registry Pull Request** - Opened at [elizaos-plugins/registry](https://github.com/elizaos-plugins/registry/pulls)
### Registry approval
An elizaOS core team member will review your registry pull request to ensure all requirements are met, the plugin is free of malicious code, and it functions as intended with proper images and a quality description.
**Typical review time:** 1-3 business days
**If approved:** Your plugin appears in the official registry and can be discovered via `elizaos plugins list`
**If changes requested:** Address the feedback and update your plugin, then re-submit.
***
## Step 6: Post-Publishing
### Plugin is now live!
Once approved, users can install your plugin to their projects:
```bash Terminal theme={null}
elizaos plugins add plugin-fal-ai
```
### Future updates
**For plugin updates after initial publishing:**
The `elizaos publish` command is only for initial publication. For all future updates, use standard npm and Git workflows - never run `elizaos publish` again.
```bash Terminal theme={null}
# 1. Make your changes and test locally
# 2. Update version in package.json
npm version patch # or minor/major
# 3. Build and test
bun run build
elizaos test
# 4. Publish to npm
npm publish
# 5. Push to GitHub
git add .
git commit -m "Update to version x.y.z"
git push origin main
```
The elizaOS registry automatically syncs with npm updates, so you don't need to manually update the registry.
***
## See Also
Help improve elizaOS by contributing to the core framework
Explore existing plugins and find inspiration
Master all elizaOS CLI commands for development
Share your plugin and get help from the community